
The Ultimate Chicken Tikka Dum Biryani: A Step-by-Step Guide to Perfection
FOOD
Aparna
7/16/20254 min read
The Ultimate Chicken Tikka Dum Biryani: A Step-by-Step Guide to Perfection
Published on: Aparna Insights
Hello, fellow food lovers!
Welcome back to Aparna Insights. If there's one dish that unites us all in celebration, it has to be Biryani. After the incredible success of our classic Hyderabadi Dum Biryani recipes, so many of you have made them perfectly and shared your beautiful results. It fills my heart with joy to see that!
Today, we're taking it to the next level with a recipe that is truly one of the best I've ever made: Chicken Tikka Dum Biryani.
This isn't your everyday biryani. The method, the flavors, and the final taste are all beautifully distinct. The chicken is incredibly tender, infused with a smoky, grilled "tikka" flavor that elevates the entire dish. This recipe requires a few extra steps and a good collection of spices, but trust me, the result is absolutely worth it. It’s a perfect dish for a Sunday feast or any special occasion.
So, let's get started and create a biryani that your family and friends will talk about for weeks!
Ingredients
This recipe has three main components: the chicken tikka, the rice, and the final layering.
For the Chicken Tikka Marinade:
Boneless Chicken: 500g, medium-sized cubes (use tender chicken, under 1kg for best results)
Lemon Juice: From ½ a lemon
Ginger-Garlic Paste: 1 tsp
Thick Curd: 500g (approx. 2 cups), preferably with cream (malai)
Kasuri Methi (Dried Fenugreek Leaves): 1 tsp
Mustard Oil: 1 tbsp (This is crucial for the authentic tikka flavor. If unavailable, use sunflower oil)
Salt: To taste (add for both marination stages)
Red Chilli Powder: 1 tbsp
Garam Masala: 1 tsp
Roasted Cumin Powder: 1 tsp
Cardamom Powder: ½ tsp
Dry Ginger Powder (Sonth): 1 tsp
Coriander Powder: 1 tsp
Kashmiri Chilli Powder: 1 tsp (for color)
Red Food Color: ¼ tsp (optional, for that restaurant-style look)
For the Biryani Rice:
High-Quality Long-Grain Basmati Rice: 2 cups
Water: 2 litres for boiling
Whole Spices:
Cloves: 6-7
Bay Leaf: 1
Green Cardamom: 4
Cinnamon: 2-inch stick
Marathi Mogga (Kapok Buds): 2
Shahi Jeera (Caraway Seeds): 1 tbsp
Star Anise: 2
Black Cardamom: 2
Javitri (Mace): 1 strand
Salt: ¼ cup (The water should be salty to properly season the rice)
Ginger-Garlic Paste: 1 tbsp
Green Chillies: 4, slit
For Layering and Dum:
Cooked Chicken Gravy: (Reserved from Step 3)
Chopped Mint Leaves (Pudina): 2 tbsp
Chopped Coriander Leaves: 2 tbsp
Fried Onions (Birista): ½ cup
Water: 3 tbsp
Ghee: ⅓ cup (approx. 80-100 ml), melted
Cardamom Powder: ¼ tsp
Saffron: 1 tsp, soaked in a little warm water
Warm Milk: ½ cup (135 ml)
Wheat or Maida Dough: For sealing the pot
Instructions
Step 1: Marinate the Chicken
First Marinade: In a mixing bowl, take the boneless chicken cubes. Add the lemon juice, salt, and 1 tsp of ginger-garlic paste. Massage this into the chicken well and let it rest for 30 minutes.
Second Marinade: After 30 minutes, add all the ingredients for the second marinade to the chicken: thick curd, kasuri methi, mustard oil, salt, all the powdered spices (chilli, garam masala, cumin, cardamom, dry ginger, coriander, Kashmiri chilli), and the red food color.
Mix and massage everything thoroughly until every piece of chicken is coated in the rich marinade. Cover and let it rest in the fridge for at least 1 hour.
Step 2: Cook the Rice
Wash and soak 2 cups of basmati rice for 1 hour.
In a large, heavy-bottomed pot, bring 2 litres of water to a rolling boil. Add all the whole spices, ¼ cup of salt, 1 tbsp ginger-garlic paste, and the slit green chillies. Let the water boil vigorously to infuse the flavors.
Drain the soaked rice and add it to the boiling water. Squeeze in the juice of half a lemon to keep the grains white and separate.
Cook on high flame only. After about 5 minutes, the rice will be 60% cooked. (A grain will break into 2-3 pieces but still have a hard center).
Cook for another 5 minutes, and the rice will be 70-80% cooked. (The grain will be softer but still have a slight bite). We will be layering the rice at these two stages.
Step 3: Cook the Gravy & Grill the Tikkas
In a heavy-bottomed biryani pot (handi), heat ⅓ cup of ghee.
Add the marinated chicken and spread it evenly. Cover and cook on medium flame for 17-20 minutes, or until the chicken is tender and cooked through. Be careful not to overcook, or the pieces will break.
Once the oil separates and the chicken is cooked, gently remove only the chicken pieces and set them on a plate, leaving the rich gravy behind in the pot.
Place a grill rack over your stovetop. Grill the cooked chicken pieces on a medium-high flame, turning them until they get a beautiful, smoky char on all sides. This is what makes it a "Tikka" Biryani! You can also do this in an oven at 220°C for 15-17 minutes.
Once grilled, set the tikkas aside.
Step 4: Layering the Biryani
Let the gravy in the handi cool down slightly. Add the chopped mint, coriander, fried onions, and 3 tbsp of water to the gravy. Mix well to slightly loosen the gravy.
First Layer of Rice: Strain the 60% cooked rice from the boiling water and spread it evenly over the gravy.
Second Layer of Rice: Now, strain the 70-80% cooked rice and spread it as the top layer. Gently spread it flat with a knife or spatula.
Garnishing: Drizzle the melted ghee over the rice. Sprinkle the cardamom powder, pour the saffron-soaked water, fried onions, and the remaining mint and coriander. Finally, pour the warm milk over the top.
Place the grilled chicken tikka pieces on top of the rice.
Step 5: The 'Dum' Process
Seal the biryani pot tightly with wheat or maida dough around the rim of the lid. Place some weight on top to ensure no steam escapes.
Cook on high flame for 8 minutes.
Then, reduce the flame to the lowest setting and cook for 7 minutes.
Turn off the flame and let the biryani rest, undisturbed, for 20 minutes. This resting time is crucial for the flavors to settle.
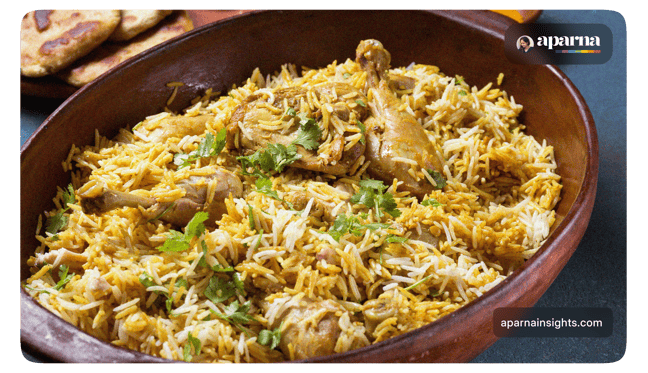
After 30 minutes of total dum and resting time, your spectacular Chicken Tikka Dum Biryani is ready. Open the lid, take in the heavenly aroma, and serve hot with cooling raita or a spicy Mirchi ka Salan. The rice will be incredibly fluffy, and every bite will be a burst of flavor. Enjoy!
With love,
Aparna @ Aparna Insights